Nest.js란?
Node.js 기반의 TypeScript용 백엔드 웹 프레임워크. 제어 역전성을 가지는 프레임워크적 성향이 강하다
제어 역전성이란?
객체의 생명 주기, 메서드의 제어를 모두 외부에 위임하는 설계 원칙
애플리케이션의 제어 책임이 프로그래머에서 프레임워크로 위임되므로, 개발자는 핵심 비즈니스 로직에 더 집중할 수 있다. Nest.js는 java spring, angular의 영감을 받았다 (어쩐지 겁나 비슷하드라)
장단점
[장점]
- 일관된 API
- 구조화된 아키텍처 (Provider, Controller, Module)
- CRUD 컨트롤러, 서비스, 유닛 테스트, DTO, 엔티티 정의까지 한방에 만들어주는 CLI
- 완벽한 타입스크립트 지원
[단점]
- 러닝 커브가 있음. 앵귤러 같다고 생각하면 된다 (앵귤러는 생각보다 굉장히 복잡하다)
- 미니멀인 Express.js에 비하면 무겁다
Nest.js를 선택 한 이유
[기술적인 관점]
- Node.js 개발 환경에서 거의 표준이다 싶은 Express.js는 높은 유연성을 가지고 있음. 그렇기에 명확한 아키텍처, 디자인 패턴을 정해놓지 않는 이상 개똥 같은 코드가 되기 십상이다
- Express.js 환경에서 타입스크립트로 세팅할 경우 타입스크립트의 이점을 온전히 다 사용하지 못하던 문제를 Nest.js를 쓰면 해결된다
- 특정 데이터가 변경되었을 때 즉각 반영되는게 추후 대시보드를 도입할 예정인 서비스랑 잘 맞는다
[협업 관점]
- 일단 백엔드 개발을 하게 된 나는 백엔드가 주담당이 아니었고, 늘 간단한 API만 구현해도 되는 환경에만 있었으며, 지금까지 디자인 패턴 없이 적절한 기능, 디렉터리 분리만 해오며 작업했기에 규칙이 정해져 있는 Nest.js가 좋을 것 같았다. 앞으로 회사에 새로운 사람이 들어왔을 때 나의 규칙을 다시 설득해야 한다거나, 인수인계 등등… 그런 소통 비용을 Express.js에 비하면 크게 줄일 수 있을 거라고 생각했고, 새로운 사람의 손을 탄 프로젝트가 아무리 똥 같아져도 (너무 똥이면 안되지만) 규칙에 크게 벗어나지 않을 거라고 기대한다
시작하기
$ npm i -g @nestjs/cli
$ nest new project-name
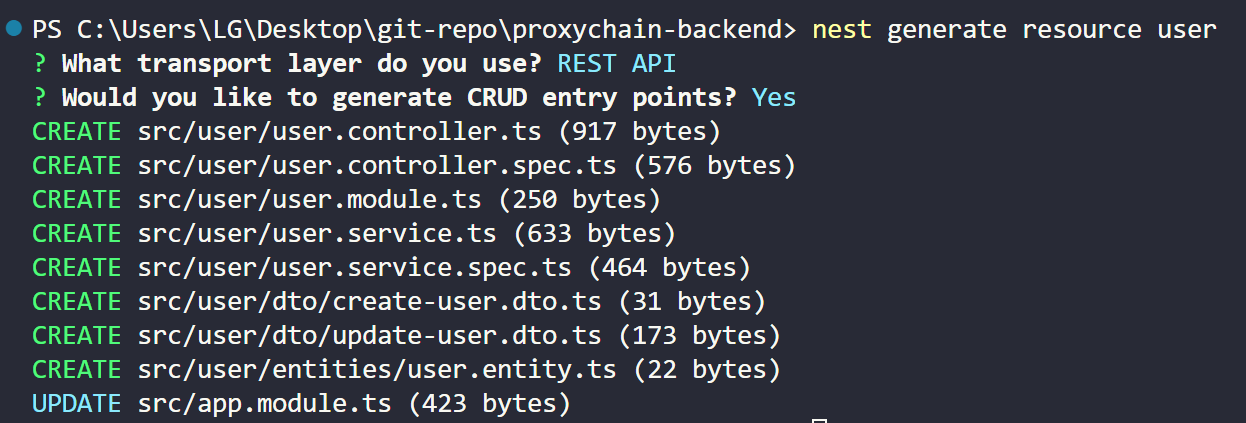
Nest.js는 cli를 통해서 CRUD 자동 생성이 가능하다
$ nest generate resource (원하는 모듈 이름)
이렇게 터미널에 입력하고 본인 상황에 맞는 선택지를 선택해 준다

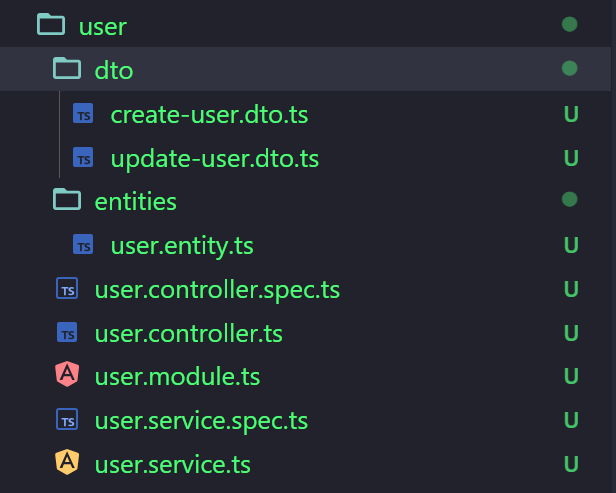
이렇게 테스트 파일(.spec)부터 service, controller, module, entity, DTO 모두 생성해 준다
구조 이해하기
간단하게 투두리스트를 만든다는 가정하에 파일들의 역할과 구조를 파악해 보자
@Module() 데코레이터
@Module({
  imports: [],
  controllers: [AppController],
  providers: [AppService],
})
export class AppModule {}- controllers : HTTP 요청을 받아서 응답을 보내는 컨트롤러
- Providers : 컨트롤러가 사용하는 다양한 일반 클래스
- imports : 해당 모듈이 의존하고 있는 다른 모듈
import { Module } from '@nestjs/common';
import { AppController } from './modules/authModule/auth.controller';
import { AppService } from './modules/authModule/auth.service';
import { TodosModule } from './todos/todos.module';

@Module({
  imports: [TodosModule],
  controllers: [AppController],
  providers: [AppService],
})
export class AppModule {}
최종으로 모듈을 만들면 루트 모듈인 app.module.ts에 추가해줘야 한다
Controller
HTTP 요청을 받아서 처리하고 응답을 해주는 역할을 담당하고 있는 클래스
express.js에서 router 개념이라고 생각하면 된다. @controller() 데코레이터를 달아주면 된다
@Controller('todos')
export class TodosController {
  constructor(private readonly todosService: TodosService) {}

  @Get()
  findAll(): Todo[] {
    return this.todosService.findAll();
  }

  @Get(':id')
  findOne(@Param('id') id: string): Todo {
    return this.todosService.findOne(+id);
  }

  @Post()
  create(@Body('title') title: string) {
    return this.todosService.create(title);
  }

  @Patch(':id')
  update(@Param('id') id: string, @Body() updateTodo: Partial<Todo>): Todo {
    return this.todosService.update(Number(+id), updateTodo);
  }

  @Delete(':id')
  remove(@Param('id') id: string): boolean {
    return this.todosService.remove(+id);
  }
}
@Controller 괄호 안에 있는 todos는 http://localhost:3000/todos 주소로 매핑된다 그리고 각각 @Get, @Post, @Patch, @Delete는 HTTP 요청 메서드. 여기 괄호 안에 들어간 :id들은 http://localhost:3000/todos/{id} 이렇게 매핑된다
Service
비즈니스 로직을 수행하는 역할을 담당.
@Injectable() 데코레이터가 붙어있는 클래스는 Nest.js가 인스턴스를 생성하여 다른 클래스에 생성자를 통해서 주입을 해줄 수 있다.
비즈니스 로직은 JS class 만들었던 것처럼 만드면 된다.
@Injectable()
export class TodosService {
  private todos: Todo[] = [];
  private idCounter = 1;

  findAll(): Todo[] {
    return this.todos;
  }

  findOne(id: number) {
    return this.todos.find((todo) => todo.id === id);
  }

  create(title: string): Todo {
    const newTodo: Todo = {
      id: this.idCounter++,
      title: title,
      create_at: new Date(),
    };
    this.todos.push(newTodo);
    return newTodo;
  }

  update(id: number, updatedTodo: Partial<Todo>): Todo {
    const todo = this.findOne(id);
    if(todo) {
      Object.assign(todo, updatedTodo)
      return todo;
    }
    return null;
  }

  remove(id: number): boolean {
    const todoIndex = this.todos.findIndex(todo => todo.id === id);
    if(todoIndex > -1) {
      this.todos.splice(todoIndex, 1);
      return true;
    }
    return false;
  }
}
Entity
typescript의 interface, type처럼 todo의 data 타입을 지정하는 거라고 생각하면 된다
export class Todo {
  id: number;
  title: string;
  create_at: Date;
}
DTO
클라이언트에서 서버로 전달되는 데이터의 형식을 지정하는 역할. 필수 파일은 아니다
export class CreateTodoDto {
  title: string;
}
todo를 생성하는 create dto를 보면 클라이언트에게 받을 값만 클래스로 지정해 줬다
export class UpdateTodoDto extends PartialType(CreateTodoDto) {
  id: string;
}
updateTodoDto는 PartialType이라는 유틸리티 타입을 통해서 CreateTodoDto 클래스를 확정하고 있다. 다만 차이점은 모든 속성을 선택적으로 입력받도록 하고 있다는 점입니다
Postman으로 결과 확인
$ npm run start:dev서버를 켜주고

postman으로 CRUD가 잘 작동하는지 확인해보면 된다
'Backend' 카테고리의 다른 글
| Nest.js 카카오 REST API 로그인 구현하기 | access token, refresh token (5) | 2024.11.08 |
|---|---|
| access token, refresh token 토큰 기반 인증 방식 | JWT, HTTP header (8) | 2024.11.05 |
| JJWT 라이브러리 설치 에러 (3) | 2021.10.17 |
| ❌ Assertion failed: new_time >= loop->time, file c:\ws\deps\uv\src\win\core.c, line 309 | Node.js 에러 (2) | 2020.11.05 |
| Node.js 시작, 세팅하기 | Express, ES6 문법 사용, nodemon 설치 (0) | 2020.10.24 |


댓글