프론트엔드 FSD 아키텍처 적용하기 | Map Service 구축하기 - 3

사이드 프로젝트인 myCafe에서 현재 모바일용 라우트도 파서 작업하고 있고, 기능이 하나둘씩 늘어가고 있는 중입니다
프론트엔드에게 좋은 로직이란 무엇일까?라는 고민을 늘 하는데요. 사실 정말 정답이 없는 분야이고, UI와 엮여있다 보니, 마냥 이상향을 쫓기란 쉽지 않은 영역이라고 생각합니다. 그렇다 보니 점점... 관심사 분리도 모호해지고, 기능 분리도 모호해지고, 상태 분리도 모호해지고... 모호함의 연속을 모호하니까~라며 내버려두다가는 진짜 똥 될 수 있는데요(?) 아무튼 정말 어려운 게 프론트엔드의 클린 코드라고 생각합니다
이전에도 FSD 아키텍처를 적용해볼까 하다가 개념이 굉장히 크길래(?) 아직은 적용할때가 아니라고 생각해서 일단 기본틀만 잡아놓고 기능구현부터 했습니다. 이젠 공통된 부분이 점점 보이기 시작하면서 슬슬 개념에 따라 분리를 해야겠더라고요. 그래서 이번에 FSD 아키텍쳐를 적용해보려고 합니다
FSD 아키텍쳐
자세한 내용은 공식문서에서 확인이 가능합니다. 제 블로그에서는 FSD 개념에 대해 깊이 있게 다루지 않습니다
공식문서와 예제들을 봤을 때 내가 느낀 건 [한마디로 도메인과 기능을 기준으로 나누다]인 것 같았습니다. 하지만 Remix.js 특성상 app/routes에 페이지가 묶여있는 형태이고(물론 수정 가능함) 공식문서의 예제를 보았을 때 매우 간단한 프로젝트인데 폴더의 뎁스가 매우 깊어진다는 걸 느꼈습니다. FSD 아키텍처 자체가 대규모 프로젝트에서 엄청난 힘을 발휘하는 것 같고, 저 같은 소규모 사이드 프로젝트에 적용할 경우 너무 코드 파편화가 이뤄질 것 같다는 느낌이 들었습니다.
그래서 결론은 제가 느낀 FSD의 장점만 빼서 프로젝트에 적용하자! 였습니다. 그래서 저는 디렉터리 구조를 아래와 같이 가져가려고 합니다
// 수정전
root/app
|─ assets
|─ components
|─ hooks
|─ routes
└─ shared

// 수정후
root/app
|─ assets
|─ widgets
|─ features
|─ entities
|─ routes
|─ providers
└─ shared- entities : 비즈니스 엔티티 (특정 도메인의 역할, 예를 들면 User, Post, Comment 등...)
- features :특정 기능에 관련된 로직. 앱과 사용자의 특정 행동(유스케이스)을 구현하는 기능을 담당. entities를 활용하여 사용자 인터랙션, 비즈니스 로직 등을 구현
- widgets : 페이지에 사용되는 독립적인 UI 컴포넌트. entities와 features를 조합하여 독립적이고 재사용 가능한 UI 블록을 구성
- providers : Context API
- shared : 공통 컴포넌트, 유틸 함수, API 요청 등 전반에 걸쳐 재사용 가능한 코드
여기서 Remix.js app 디렉터리 구조와 FSD 개념과 충돌되는 부분이 프로바이더 로직의 위치입니다. 보통은 root에 app, entities, features....가 있어야하는데 저같은 경우에는 root/app안에 속해있죠. 그래서 context API 코드들을 shared 디렉토리 안에 두는 게 개념적으로 맞을까? 싶었으나... 생각해 보면 프로바이더는 재사용을 하는 개념은... 아니지 않나? 싶더라고요 root에 한번 설정하면 끝인 개념이기에 재사용이란 말이랑은 안 맞는 것 같으니 shared에 넣지 말고 따로 디렉터리를 빼기로 했습니다
/entities
root/app/entities
|─ auth
|─ cafe
|─ directions
|─ search
|─ review
└─ user
entities 디렉터리는 위와 같이 나누었습니다. 제 서비스에서는 6개가 핵심 서비스입니다
/features
root/app/features
├── auth/
│   ├── index.ts
│   ├── authSignUp/
│   ├── authSignin/
│   └── authLogout/
├── review/
대표적으로 auth 디렉터리만 말하자면 위와 같이 나눴습니다
/shared
// 수정전
root/app/shared
|─ consts
|─ contexts
|─ utils
└─ types.ts

// 수정후
root/app/shared
|─ lib
|─ ui
└─ types.ts
위와 같이 기존에 있던 shared 내부 디렉토리 구조도 바꿨습니다.
- ui : components 파일을 ui로 변경
- lib : utils 폴더는 lib로 변경
- context : 상위 디렉터리로 옮기고 providers로 변경
- conts : 전역에 쓸만한 배열, 오브젝트를 모아두는 곳이었는데 그다지 필요가 없고, 만들 거면 이 또한 기능별로 구별하는 게 맞을 것 같아서 삭제
(widgets디렉터리는 아래에서 다루겠습니다)
FSD 아키텍처에 맞게 코드 분리하기
export async function action({ request }: ActionFunctionArgs) {
  const formData = await formDataPromise(request);

  const email = String(formData.get("email"));
  const name = String(formData.get("name"));
  const password = String(formData.get("password"));
  const password2 = String(formData.get("password2"));
  const profile = formData.get("profile") as File;

  const errors: Record<string, string> = {};

  if (!email.includes("@")) errors.email = "올바른 이메일 형식이 아닙니다.";
  if (password === password2) errors.password = "비밀번호가 일치하지 않습니다";

  const userExists = await db.user.findFirst({
    where: { email },
  });

  if (userExists) errors.userExists = "이미 가입한 유저입니다.";
  if (Object.keys(errors).length > 0) return json({ errors });

  if (profile?.size === 0) {
    await register({ email, name, password });
    return redirect("/signin");
  } else {
    const imageUrl = await uploadPromise(profile);
    await register({ email, name, password, profile: imageUrl as string });

    return redirect("/signin");
  }
}

export default function SignupRoute() {
  const actionData = useActionData<typeof action>();
  const { handleFileUpload, fileRef } = useImageUpload();
  const [preview, setPreview] = useState<string>();

  return (
    <Form method="post" encType="multipart/form-data">
      <h1 className="w-full text-center text-xl font-semibold">
        ☕ myCafe 회원가입
      </h1>
      <div className="mt-8 space-y-3">
        <div>
          <div className="bg-trueGray-200 relative mx-auto h-20 w-20 overflow-hidden rounded-full">
            <button
              type="button"
              onClick={handleFileUpload}
              className="absolute left-0 top-0 z-10 block h-full w-full bg-transparent"
            ></button>
            {preview && (
              <img
                src={preview}
                alt="프로필 이미지"
                className="absolute z-[5] h-full w-full object-cover"
              />
            )}
          </div>
          <input
            name="profile"
            ref={fileRef}
            onChange={(e) => {
              if (e.target.files) {
                for (const file of e.target.files) {
                  if (imageMaxSize(file)) return;
                  setPreview(URL.createObjectURL(file));
                }
              }
            }}
            type="file"
            accept=".jpg, .jpeg, .png"
            hidden
          />
        </div>
        <div>
          <input
            name="email"
            className="w-full rounded-full border border-neutral-400 px-2 py-2 outline-none placeholder:text-neutral-400"
            type="text"
            required
            placeholder="이메일을 입력해주세요."
          />
          {actionData?.errors.email && (
            <p className="mt-1 pl-2 text-xs text-red-500">
              {actionData?.errors.email}
            </p>
          )}
        </div>
        <input
          name="name"
          className="w-full rounded-full border border-neutral-400 px-2 py-2 outline-none placeholder:text-neutral-400"
          type="text"
          required
          placeholder="이름을 입력해주세요."
        />
        <input
          name="password"
          className="w-full rounded-full border border-neutral-400 px-2 py-2 outline-none placeholder:text-neutral-400"
          type="password"
          required
          placeholder="비밀번호를 입력해주세요."
        />
        <div>
          <input
            name="password"
            className="w-full rounded-full border border-neutral-400 px-2 py-2 outline-none placeholder:text-neutral-400"
            type="password"
            required
            placeholder="비밀번호를 한번 더 입력해주세요."
          />
          {actionData?.errors.password && (
            <p className="mt-1 pl-2 text-xs text-red-500">
              {actionData?.errors.password}
            </p>
          )}
        </div>
      </div>
      {actionData?.errors.userExists && (
        <div className="mt-4 w-full">
          <p className="text-center text-sm font-semibold">
            이미 회원가입한 유저입니다.
          </p>
          <Link
            to="/signin"
            className="text-interaction mt-1 flex items-center justify-center gap-2 text-center font-semibold"
          >
            <span>로그인 하기</span>
            <ArrowLongRightIcon />
          </Link>
        </div>
      )}
      <button
        type="submit"
        className="bg-interaction mx-auto mt-8 block w-40 rounded-full py-2 font-semibold text-white"
      >
        회원가입
      </button>
    </Form>
  );
}
현재 말도 안 되게 긴 코드... 바로 회원가입 페이지 UI입니다
일단 기능 구현이 먼저였고, 디자인이 있는 채 개발을 진행한 게 아니다 보니 공통적으로 만들 UI 컴포넌트조차 정해져 있지 않은 상태였습니다. 그렇다 보니 page 컴포넌트의 비즈니스 로직이 모두 작성되어 있고, UI 또한 분리되지 못한 채 모두 작성되고 있었습니다. 저 또한 이게 나쁜 케이스란 거 정말 너무 잘 압니다. 하지만 제 나름의 이유가 있는데요. 아예 MVP부터, 밑바닥이 아닌 바닥을 파는 것부터 작업을 해야 하는 경우에는 아키텍처를 먼저 생각하기보다는, 기능구현부터 하는 게 맞다고 생각합니다. 이건 스타트업일수록 더 맞다고 생각합니다. 그렇다고 무지성으로 하라는 건 아닙니다. 아무리 허허벌판이라도 어느 정도 공통된 컴포넌트가 보이고, 공통된 비즈니스 로직이 보이긴 하죠. 그런 건 당연히 분리하며 작업해야 합니다. 근데 아무것도 없는데 클린 코드를 작성해야 한다며 그 고민하느라 기능구현이 밀리면 안 된다는 걸 의미합니다. 초반에는 비즈니스 로직도 hook로 만들지 못하고 모두 page에 때려 박았다가 이젠 hook 또는 Context API로 분리했고, 이제 기본 CRUD를 하는 기능을 모두 갖췄으니 UI도 분리해야 할 때라고 생각합니다
/entities
root/app/entities
├── auth/
│ ├── index.ts
│ ├── types.ts
│ ├── api/
│ │ └── registerApi.tsx
│ ├── model/
│ │ └── authSignup.tsx
│ └── lib
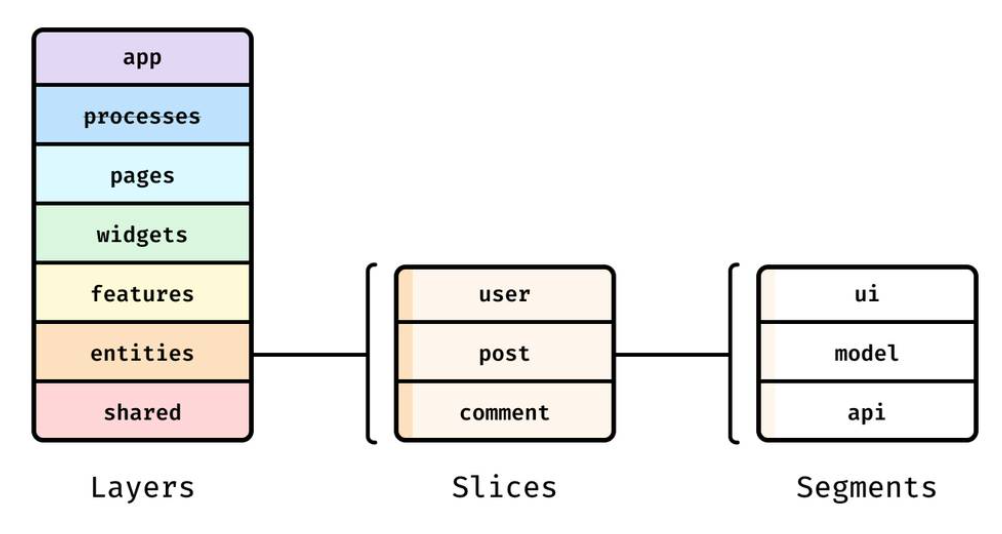
│ └── validate.tsx위와 같이 entities 내부 구조를 만들었습니다. 이 부분이 FSD 아키텍처의 세그먼트에 해당됩니다
- auth라는 큰 서비스 (도메인 개념)
- index.ts : types과 model import
- types.ts : auth라는 도메인에서 쓰일 공통 type
- model 디렉터리 : 비즈니스 로직을 담당. 상태와 상호작용. redux를 쓴다면 여기에 로직을 쓰면 됩니다
- lib : auth 안에서 쓰일 유틸 함수 또는 보조 기능 (개인적으로 이 부분이 모호한 느낌?)
- api : 필요한 서버 요청
// entities/api/registerApi.tsx
export async function registerApi(user: IAuthProps): Promise<void> {
	// API 호출
}

export async function findEmailApi(email: string): Promise<boolean> {
	// API 호출
}
// entities/auth/lib/validate.tsx
// 유효성 검사 로직
export function validate({
email,
password,
password2,
userExists,
}: IValidate): IRegisterErrors {
const errors: IRegisterErrors = {};
if (!email.includes("@")) errors.email = "올바른 이메일 형식이 아닙니다.";
if (password !== password2) errors.password = "비밀번호가 일치하지 않습니다";
if (userExists) errors.userExists = "이미 가입한 유저입니다.";
return errors;
}// entities/auth/model/authSignup.tsx
// 서버사이드 action 함수내에서 호출할 비즈니스 로직
export async function authSignup(request: Request) {
const formData = await formDataPromise(request);
const data = Object.fromEntries(Array.from(formData.entries()));
const { password2, ...otherData } = data;
const userExists = await findEmailApi(data.email as string);
const errors = validate({
email: otherData.email,
password: otherData.password,
password2: password2,
userExists,
} as IValidate);
if (Object.keys(errors).length > 0) return json({ errors });
const imageUrl: string | null = await uploadPromise(data.profile as Blob);
await registerApi({ ...otherData, profile: imageUrl } as IAuthProps);
return redirect("/signin");
}// entities/auth/index.ts
export * as authTypes from "./types";
export { authSignup } from "./model/authSignup";
// entities/auth/types.ts
// 각종 타입들 정의
export interface IRegister {}
export interface IAuthProps {}
export interface IValidate {}
export type IRegisterErrors = Record<string, string>;위와 같이 파일별로 기존 page안에 있던 코드들을 분리해서 작성해 줬습니다
/features
root/app/features
├── auth/
│   ├── index.ts
│   ├── authSignUp/
│   │   ├── SignupForm.ui.tsx
│   │   ├── UploadProfile.ui.tsx
│   │   └── index.ts
features 구조입니다. 이 부분도 세그먼트랑 동일하게 짜고, 개념도 동일합니다. 단, features는 특정 기능에 관련된 로직을 구성하는 개념이니 auth 서비스의 일부분인 회원가입 관련 authSignup 디렉터리를 생성했습니다. 그 밑에 필요에 따른 model, ui 등등을 구성하면 되는데, 저는 굳이 디렉터리로 만들진 않았습니다. 이유는 현재 ui밖에 구성되지 않을 것 같은데 그러면 굳이.. 불필요한 뎁스라고 생각해서. ui를 파일명에 붙여서 구별되게 해 줬습니다
- SignupForm.ui.tsx : 말 그대로 회원가입 UI form 로직이 담겨있습니다. 여기에는 비즈니스 로직이 없습니다
- UploadProfile.ui.tsx : 이 부분은 회원가입 안에 있는 기능이지만 회원가입과는 다른 file을 업로드하는 로직만 담당하는 ui이기에 독립적으로 분리하는 게 맞다고 생각했습니다. 그렇다고 auth안에서 다른 곳에 쓰이진 않아서 authSignup안에 생성했습니다
ui 파일밖에 없는데 저 같은 경우에는 회원가입에 특정 기능을 하는 비즈니스 로직이 따로 없어서였습니다. 중간에 회원가입 비즈니스 로직이 entities가 아닌 features에 위치해야 하는 게 아닐까? 란 고민을 했었습니다. 왜냐하면 회원가입 외에는 불러올 곳이 없으니까. 근데 저 같은 경우에는 반응형으로 웹사이트를 만들게 아니고, 모바일 전용 라우트를 따로 팔 예정이라서 회원가입 페이지가 최종 2개가 있을 예정이었습니다. 그래서 제 상황에서는 entities에 있는 게 개념에 더 맞는 것 같았습니다. 근데 이런 경우가 아니라면 features에 model 세그먼트에 있는게 개념적으로 더 맞는 것 같습니다!
// SignupForm.ui.tsx
export function SignupForm({ data, handleFileUpload, fileRef }: ISignupForm) {
  return (
    <Form method="post" encType="multipart/form-data">
         <UploadProfile
            handleFileUpload={handleFileUpload}
            fileRef={fileRef}
         />
		// ...
    </Form>
  );
}

// UploadProfile.ui.tsx
function PreviewWithAction({ handleFileUpload, preview }: IPreviewWithAction) {
  return (
	// ...
  );
}

export function UploadProfile({ handleFileUpload, fileRef }: IUploadProfile) {
  const [preview, setPreview] = useState<string>();

  return (
	// ...
  );
}
위와 같이 ui 코드를 옮겨줬습니다. state를 model 개념으로 따로 빼야 하나? 싶었는데, 무슨 특별한 로직을 하는 게 전혀 아니라서... hook으로 뺄 필요도 없는 로직이라서 ui에 포함시켰습니다
회원가입 page 최종 코드
export async function action({ request }: ActionFunctionArgs) {
  const result = await authSignup(request);
  return result;
}

export default function SignupRoute() {
  const data = useActionData<typeof action>();
  const { handleFileUpload, fileRef } = useImageUpload();

  return (
    <>
      <SignupForm
        handleFileUpload={handleFileUpload}
        fileRef={fileRef}
        data={data}
      />
    </>
  );
}
이로서! 이렇게 리팩토링 되었습니다!!! 부모가 되는 page 컴포넌트 길이가 확 줄었습니다. 여기서 useImageUpload라는 hook import를 어디에 하는 게 좋을까?란 고민이 생겼는데, useImageUpload hook이 회원가입에 국한되어있는 hook이라면 features ui 컴포넌트에 import 하는게 맞는데, 저 hook같은 경우에는 전 페이지에 쓰이는 global hook이라서 page 컴포넌트에 import 해줬습니다
UI 로직 나누기 (widgets)
하지만 아직 SignupForm 컴포넌트의 UI 로직이 매우 깁니다
제 머릿속에 있는 걸 만든 거다 보니 생각보다 공통된 UI가 없습니다. 특정 페이지 안에서만 쓰일 UI가 많더라고요. 이런 식으로 현업에서 생각보다 재사용이 불가능하고 한 페이지에서만 쓰일 UI들이 많아지는 경우가 있습니다. 근데 전 현재 FSD 아키텍처를 바탕으로 하기 때문에 UI 분리가 쉽게(?) 이루어질 수 있습니다. 회원가입 UI는 auth라는 도메인 한해서 재사용되는 것들도 있고, 아예 shared에 넣어서 글로벌하게 사용할 UI도 조금 있습니다. 그럼 일단 widgets 디렉터리를 이용해 보겠습니다!
root/app/widgets
├── auth/
│   ├── ui/
│   │   ├── AuthLayout.tsx
│   │   ├── ErrorMsg.tsx
│   │   ├── MsgWithAction.tsx
│   │   ├── SubmitButton.tsx
│   │   └── index.ts

root/app/shared
├── ui/
│   ├── input.tsx
│ │- widgets/auth/ui : auth 도메인 안에서 공통적으로 쓰일 ui들을 만들었습니다. 전 페이지에서 재사용은 불가능하고 정말 auth 도메인 안에서만 재사용이 가능한 컴포넌트들입니다
- shared/ui/input.tsx : input을 전페이지에서 재사용하기 위해 만들었습니다
각각 파일별로 UI 로직들을 짜면 됩니다. 여기에는 비즈니스 로직이 포함되어있으면 안 됩니다. 그리고 도메인 안에서도 재사용이 아예 불가능하다면 최대한 특정 기능과 묶어서 features작성하는 게 맞을 것 같다는게 개인적인 생각입니다. 로직이랄것도 없다면 page에 작성하는게 개념적으로 맞는 것 같습니다
SignupForm 컴포넌트 최종 코드
export function SignupForm({ data, handleFileUpload, fileRef }: ISignupForm) {
  return (
    <AuthLayout>
      <Form method="post" encType="multipart/form-data">
        <div className="mt-8 space-y-3">
          <UploadProfile
            handleFileUpload={handleFileUpload}
            fileRef={fileRef}
          />
          <div>
            <Input
              name="email"
              type="text"
              required
              placeholder="이메일을 입력해주세요."
            />
            {!data?.errors.userExists && data?.errors.email && (
              <ErrorMsg text={data?.errors.email} />
            )}
          </div>
          <Input
            name="name"
            type="text"
            required
            placeholder="이름을 입력해주세요."
          />
          <Input
            name="password"
            type="password"
            required
            placeholder="비밀번호를 입력해주세요."
          />
          <div>
            <Input
              name="password2"
              type="password"
              required
              placeholder="비밀번호를 한번 더 입력해주세요."
            />
            {!data?.errors.userExists && data?.errors.password && (
              <ErrorMsg text={data?.errors.password} />
            )}
          </div>
        </div>
        {data?.errors.userExists && (
          <div className="mt-4 w-full">
            <MsgWithAction
              link="/signin"
              buttonText="로그인 하기"
              Msg="이미 회원가입한 유저입니다."
            />
          </div>
        )}
        <SubmitButton />
      </Form>
    </AuthLayout>
  );
}
이로서 무려 152줄 정도 되었던 컴포넌트가 약 70줄로 줄어들었습니다
마무리
일단 블로그에는 가장 쉽게 적용해볼 수 있는 auth부터 시작했습니다
이제 이걸 시작으로 다른 코드들도 모두 리팩토링 해줄 예정입니다. 확실히 개념이 복잡하다보니 auth안에 회원가입 로직에만 적용하는데 시간이 많이 걸렸습니다
FSD도 하나의 개념이기에 서비스 규모가 커지면 커질수록 나누다보면 개념이 모호해질 수 있다고 생각합니다. 그리고 프론트엔드면 모호해지는게 당...ㅇ..ㅕㄴ... 아무튼! 클린 코드는 신경을 쓰면 쓸수록 좋아지니까요! 지금은 이렇게 작성했지만 계속 적용해나가다보면 다른식으로 바뀔 수도 있을 것 같습니다. 하다보면 개념이 더 잡힐때도 있고, 더 좋은 코드가 떠오를때도 있고 그러니까요ㅎㅎ